

Overview
This page is a summary of all my experimental motor experience. My journey began with the first rocket motor I designed in high school, and is being added to constantly as I add to the long list of things I want to try in experimental propulsion.
My First Experimental Motor Design


After becoming interested in propulsion in high school, I began learning all I could about rocket propulsion design. As a senior, I decided that I wanted to build a 3" ID test motor to learn about motor design, manufacturing, and testing. Upon doing some research, I realized that I would need a very important piece of machinery if I were to make this motor: a lathe. My school did not have a lathe at that time, but had just got a nice new small workshop with a cheap CNC router, some scroll saws, a drill press, and some hand tools. I realized that to make my project happen I needed a lathe, but didn't have the money for one. To change this, I submitted proposals to my school's PTSA arguing for the benefit of a lathe to the school, and eventually, after a few months of convincing, was able to get a lathe for the school. After setting it up, I machined the nozzle (pictured below), the retention ring, and got to work on the bulkhead. Unfortunately, I was slow at machining at the time and my designs were poor, so I was not able to finish the motor. Once I got to CU and started making larger motors, I felt no need to go back, but the experience designing and manufacturing this motor gave me boosted me successfully into the world of experimental rocketry.
38mm Propellant Characterization Program
Video shot and edited by Nate Kuczun
.jpg)
The test set-up used for the 38mm propellant characterization program. After static firing 11 38mm motors, we were confident enough in our propellant's characteristics to design the 4" single grain motor below. This test set-up has been modified, but the same stand has been used for every 4" composite motor static fire to date as of April 2020.

4" Test Motor
When I came to CU Boulder as a freshman, CU SRL was called COBRA Rocketry and we had not ever static fired a custom motor. After characterizing our own propellant with the 38mm motors, we decided to step it up to a 4" ID motor on our way to making a 3 grain flight motor for Copperhead. This was the first motor I had ever designed, manufactured, and static fired that was considerably bigger than an Estes motor. At this time, nobody on the team knew a whole lot about experimental rocketry, so this motor was a huge success, and gave many of us the experience and confidence necessary to continue to much larger goals with Composite Motor Development and eventually Spaceshot.
Cryo Converter for LOX and LCH4 Production
In order to facilitate more cost effective testing of Jalapeno, Reaper, and the gas generator powered turbopump for Reaper, I designed a system to convert gaseous oxygen and methane to LOX and LCH4 using a simple set-up with LN2, an aluminum tube, an aluminum plate welded onto the bottom of the tube. copper tubing wound into coils, JIC fittings, a needle valve, an aluminum lid, and of course gaseous input lines and cryogenic transfer tubing for filling the propellant tanks. This design intakes gas at the top of the device and outputs liquid at the bottom. This is done to maintain a constant negative slope in the copper coils to prevent pooling of liquid propellants. If it were not designed this way, methane would pool at the bottom of the coils and freeze, possibly cracking the tubes, ruining the device, and spreading gaseous methane to an oxygen rich environment nearby in the oxygen converter and tanks.
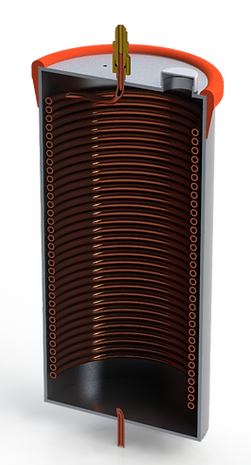
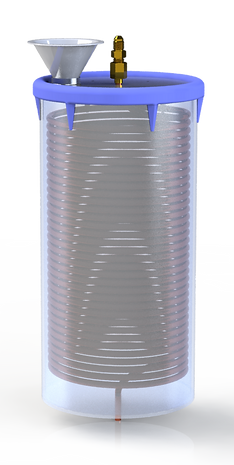
On the left is the GCH4 to LCH4 heat exchanger/cryo converter, and on the right is the GOX to LOX heat exchanger/cryo converter. Both of these devices have the same design, but the CH4 cryo converter will be able to have a higher mass flow rate through it than the O2 cryo converter because of the relative energy extraction required for a state change in each substance.